
Choose a topic below
VR412 FULL-RANGE SPEAKER
As a Main Speaker (with Subwoofer info)

Make sure ROUTING is set for your use
- If using a single VR412, set to Normal (Mono)
- If linking two VR412s for stereo operation, set first VR412 to Stereo Master, set second VR412 to Link In
- If linking two VR412s for mono operation, set first VR412 to Normal (Mono), set second VR412 to Link In
- WHEN ROUTING IS SET TO LINK IN, all inputs except LINK IN are disabled/muted on that VR412

VOICING should be set to match your use
- Standard is full frequency response
- Club has extra bass
- Speech removes low frequencies, for less feedback potential, and greater intelligibility
- Floor Monitor is for use a floor “wedge”

SUB CUT should be off, unless feeding a subwoofer
- This is only used when connecting a subwoofer to VR412’s MIX OUT
- Instructions for use with a VRS18 subwoofer are here

At least one INPUT should be connected to a source you want to hear from VR412
- For INPUT 1 or 2, the Mic/Guitar/Line switch should match the source type
- For any inputs used, turn the INPUT knob to noon (middle), then adjust as needed
- Complete details of input capabilities are here

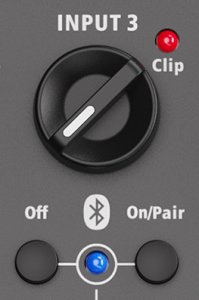
Look out for CLIP and LIMIT LEDs
- If any of these are lit, sound will be distorted
- If any CLIP LEDs lights, turn down that INPUT knob, until the CLIP LED no longer lights
- If the LIMIT LED lights, turn down VR412’s VOLUME
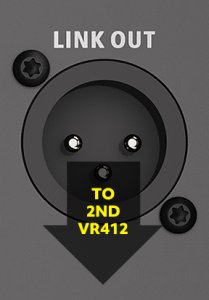
A second VR412 or other speaker can be linked from this one
- Connect the LINK OUT to feed the next VR412 or other speaker
- If that next speaker is a VR412, connect to its LINK IN, and set its ROUTING to Link In
- Complete details of linking capabilities are here
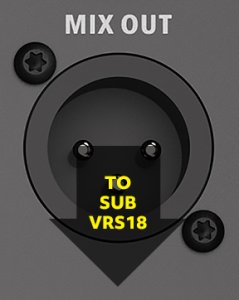
A VRS18 or other subwoofer can be connected from a VR412
- Connect the MIX OUT from the VR412 to feed the VRS18 or other subwoofer
- Turn on VR412’s SUB CUT, and set VRS18’s CROSSOVER FREQUENCY to Full-Range Output
- Details on connecting subwoofers are here
VR412 Pair for Bluetooth Audio ONLY
- Connect detachable power cord between VR412 and a power source
- Turn this VR412’s power on
- Turn this VR412’s INPUT 3 knob on VR412 to noon (halfway)
- Press this VR412’s Bluetooth On/Pair button, so blue LED flashes
- DO NOT POWER ON THE SECOND VR412 YET
Make sure ROUTING is set for your use
- Set ROUTING to Stereo Normal (Mono)
Set VOICING to Standard or Club
- Standard is full frequency response
- Club has extra bass
- Other voicings are intended for other uses, not Bluetooth music
Now pair your phone or other Bluetooth source to this VR412
- From your phone or other Bluetooth audio source, pair to VARI VR412
- Play audio from Bluetooth audio source
- Use volume controls on Bluetooth source device to adjust level
- Connect detachable power cord between second VR412 and a power source
- Turn second VR412’s power on
- Turn second VR412’s INPUT 3 knob on VR412 to noon (halfway)
- Press second VR412’s Bluetooth On/Pair button, so blue LED flashes
- WAIT UP TO 30 SECONDS, until Bluetooth LEDs on both VR412s are green
- You should now have stereo audio playing from your Bluetooth source, to both speakers
- Your Bluetooth source’s volume controls will adjust the volume
- If you need even higher volume, you can increase the INPUT 3 knobs of both VR412 units
- Be sure to set both VR412 units to the same INPUT 3 knob setting
- If Bluetooth source’s volume is at maximum, then INPUT 3 knob should generally be set no higher than 3 o’clock (pointing straight to the right) to avoid clipping
- If CLIP LED for INPUT 3 lights, turn down INPUT 3 knob
If any of these are lit, sound will be distorted
- If any CLIP LEDs lights, turn down that INPUT knob, until the CLIP LED no longer lights
- If the LIMIT LED lights, turn down VR412’s VOLUME
SUB CUT should be off, unless feeding a subwoofer
- This is only used when connecting a subwoofer to VR412’s MIX OUT
- If you are using a VRS18 subwoofer with your VR412s, turn on SUB CUT
- Then connect the MIX OUT from the first VR412 to INPUT 1 of the VRS18
- Also connect the MIX OUT from the second VR412 to INPUT 2 of the VRS18
- Set VRS18 LEVEL to +4
- Set VRS18 VOLUME knob to middle (noon) setting
- Set VRS18 CROSSOVER FREQUENCY to Full-Range Output
- Adjust VRS18 TIME ALIGNING DELAY for maximum low frequency response, according to the rear panel instructions
As a Floor Monitor “Wedge”
VOICING should be set to Floor Monitor
- This reduces low frequencies, and helps minimize feedback
ROUTING should be set to Normal (Mono)
- If routing is set to Link In, all inputs except LINK IN are disabled/muted
SUB CUT should be off
- This is only used when connecting a subwoofer to VR412’s MIX OUT
At least one INPUT should be connected to a source you want to hear from VR412
- For INPUT 1 or 2, the Mic/Guitar/Line switch should match the source type
- For any inputs used, turn the INPUT knob to noon (middle), then adjust as needed
- Complete details of input capabilities are here
More VR412s (or other monitors) can be linked from this one
- Connect the LINK OUT to feed the next monitor
- If the next monitor is a VR412, and you want it to be the same volume and sound as the first VR412, connect to the LINK IN on that next VR412, and set its ROUTING to LINK IN
- If you want to have separate volume control for that next monitor, connect to that monitor's INPUT 1, set its routing to Normal (Mono), and set its VOICING to Floor Monitor
- Complete details of linking capabilities are here
VR412 Full Info
- If using a pair of VR412 speakers, start by setting up ONLY THE LEFT VR412
- Set power switch on VR412 rear panel to OFF
- Connect detachable power cord between VR412 and a power source
- LEAVE THE POWER OFF UNTIL STEP 4
At least one INPUT should be connected to a source you want to hear from VR412
-
- Before connecting any sound source to VR412, power that source on
- Start with INPUT 1, INPUT 2, INPUT 3 knobs on VR412 all turned to minimum (off)
- Connect all sound sources to inputs on VR41: all input jacks can be used at once
INPUT 1 and INPUT 2 can accept microphone, guitar, or instrument/electronics inputs
Slide the switch above each of these jacks, to select the type of input
- Mic: Ample gain (volume range) is provided, and low frequencies from this input are reduced to avoid “rumble,” or “pops” from P’s and T’s
- TECH NOTE: a -12dB gain @ 80Hz HPF filter is applied for Mic input
- Guitar: Plenty of gain (volume range) is provided, and low frequencies from this input are reduced to avoid “rumble,” or “pops” from P’s and T’s
- TECH NOTE: a -6dB gain @ 80Hz HPF filter is applied for Guitar input
- Line: This input provides full frequency response
- Now power on this VR412
Make sure ROUTING is set for your use
- If using a single VR412, set to Normal (Mono)
- If linking two VR412s for stereo operation, set first VR412 to Stereo Master, set second VR412 to Link In
- If linking two VR412s for mono operation, set first VR412 to Normal (Mono), set second VR412 to Link In
- When routing is set to Link In, all inputs except LINK IN are disabled/muted on that VR412
Set VOICING for your use
- Standard is full frequency response
- Club has extra bass
- Speech removes low frequencies, for less feedback potential, and greater intelligibility
- Floor Monitor is for use a floor “wedge”
SUB CUT should be off, unless feeding a subwoofer
- This is only used when connecting a subwoofer to VR412’s MIX OUT
- For any input in use, turn the source device’s output to maximum
- Then turn left VR412’s INPUT knob for that input to noon (halfway)
- Then adjust VR412’s INPUT knobs as needed to get the right balance of volumes between the different sources
- Press this VR412’s Bluetooth On/Pair button, so blue LED flashes
- From your phone or other Bluetooth audio source, pair to VARI VR412
- Play audio from Bluetooth audio source
- Turn VR412’s INPUT 3 knob to noon (halfway)
- Use volume controls on Bluetooth source device to adjust level
- Adjust INPUT 3 knob on VR412 as needed to get the right balance of volumes between the different sources you are using
- If Bluetooth source’s volume is at maximum, then INPUT 3 knob should generally be set no higher than 3 o’clock (pointing straight to the right) to avoid clipping
- If CLIP LED for INPUT 3 lights, turn down INPUT 3 knob
If any of these are lit, sound will be distorted
- If a CLIP LED lights, turn down the knob for that INPUT until CLIP no longer lights
- To avoid clipping, play each source on its own at its highest level, and if the CLIP LED comes on, turn down the knob for that INPUT until its CLIP no longer lights
- If LIMIT LED lights, the overall level is too high
- Turn down the loudest input
Start with power for the second VR412 turned off
- Set power switch on that second VR412’s rear panel to OFF
- Connect detachable power cord between that second VR412 and a power source
- That VR412 will be the right speaker (the first VR412 is the left speaker)
- Connect a standard microphone cable (XLR female to XLR male) from LINK OUT jack on left VR412 to LINK IN jack on right VR412
- Make sure it is set to STEREO MASTER LED if you want the VR412s to operate as a stereo pair
- Or set it to Normal (Mono) ROUTING if you prefer mono operation
- Set right VR412’s ROUTING to Link In
-
- All other inputs and controls on this VR412 will be disabled while it is set to Link In
- If a VR412 is sending audio to a VRS18, turn on the VR412’s SUB CUT
- VR412 performs a crossover, sending the lowest frequency range to the subwoofer only, and keeping the frequency range above this for the VR412 to amplify
- VRS18’s CROSSOVER FREQUENCY should be set to Full-Range Output in this setup
- If using a linked pair of VR412s, connect only the first (left) VR412’s MIX OUT to the first (or only) subwoofer’s INPUT 1
- Set VRS18 LEVEL to +4 and set its VOLUME between noon (pointing straight up) and 3 o’clock (pointing directly to the right)
- Set VRS18’s CROSSOVER FREQUENCY to Full-Range Output in this setup
- Connect OUTPUT 1 of the first VRS18 subwoofer to the second subwoofer’s INPUT 1
VRS18 SUBWOOFER
VRS18 Subwoofer Linked from Harbinger VR412
When a linked pair of VR412s is being used with VRS18 subwoofer
- Only the first VR412’s MIX OUT should be connected to the VRS18
- The second VR412 should not be connected to a subwoofer
- The first VR412’s MIX OUT should be connected to VRS18’s INPUT 1
- The first VR412’s SUB CUT should be turned on
- VRS18’s CROSSOVER FREQUENCY should be set to Full-Range Output
- Full details and step-by-step instructions are here (link to VRS18 Full Info)
VRS18 Subwoofer feeding full-range speakers
This is a common traditional way to connect a subwoofer
- A source such as a DJ Controller or Mixer feeds audio to the subwoofer(s)
- The subwoofer(s) “crossover” the audio, and feed audio through to full-range speakers
- VRS18 has 2 parallel input/output paths, so left and right audio signals from a source with stereo output can be kept separate, to feed left and right full-range speakers
- Full details and step-by-step instructions are here
VRS18 Full Info
VRS18 Details and Step-by-Step Instructions
- Set power switch on VRS18 subwoofer’s rear panel to OFF
- Connect detachable power cord between VRS18 and a power source
- DON'T TURN ON THE VRS18 POWER until all its inputs are connected and powered on
- DON'T TURN ON THE VRS18 POWER until all its inputs are connected and powered on
- After any sources are connected and powered on, then power on VRS18
- Set POLARITY to NORMAL
- Set LEVEL set to +4
- Set VOLUME knob to noon (middle)
- Set TIME ALIGNING DELAY knob to Off
- Set CROSSOVER FREQUENCY to Full Range Output
- If any of these are lit, sound will be distorted
- If any CLIP LEDs lights, turn down that the output from the source feeding that input, until the CLIP LED no longer lights
- If the LIMIT LED lights, turn down VRS18’s VOLUME
- VOLUME knob increases/decreases the level heard from the subwoofer’s speaker
- If you can’t get loud enough sound from the VRS18 speaker, change LEVEL to -10, sound from speaker will be louder, and you may need to then turn down VOLUME
- If LEVEL is set to -10, and any CLIP LED is on, change LEVEL to +4
- This control only needs to be adjusted if low frequencies don’t seem as loud as expected
- Play audio with strong low frequencies
- Listen to the difference in sound when POLARITY is set to NORMAL, vs. REVERSE
- Leave it on the setting that gives stronger low frequencies
- This control only needs to be adjusted if low frequencies don’t seem as loud as expected
- Play audio with strong low frequencies
- Listen to the difference in sound as TIME ALIGNING DELAY knob is moved
- Set the knob to the setting that gives the strongest low frequencies
- If VRS18 is receiving audio from a VR412 with SUB CUT on, this should be set to Full-Range Output
- VR412 is performing crossover, so VRS18 crossover is not needed
- If VRS18 is receiving audio from an audio source such as a DJ Controller or Mixer, and subwoofer’s outputs are feeding audio through to full-range speakers, then VRS18’s CROSSOVER FREQUENCY can be used to divide frequency ranges between the subwoofer and full-range speakers
- Audio below the crossover frequency goes to the subwoofer’s speaker only
- Audio above the crossover frequency goes to the full-range speaker(s) only
- Frequencies that typically work well for feeding 12-inch or 15-inch 2-way full-range speakers are indicated
- Frequencies that typically work well for feeding 8-inch or 10-inch 2-way full-range speakers are indicated
TROUBLESHOOTING
Check ROUTING
- Make sure it is not set to LINK IN unless this VR412 is receiving audio from the LINK OUT of another VR412 that is acting as the first/master speaker of a linked pair
- Make sure the knob for any INPUT you are using is turned up
- Make sure VR412 is powered on (at least one green LED on the rear of VR412 should be lit)
If any of these LEDs are lit, sound will be distorted
- If any CLIP LEDs lights, turn down that INPUT knob, until the CLIP LED no longer lights
- If the LIMIT LED lights, turn down VR412’s VOLUME
These steps should resolve any Bluetooth trouble you may encounter
- iPhone/iPad users
- Power off VR412 and leave it off
- Open Settings on iPhone/iPad, select Bluetooth
- If VARI VR412 is listed under MY DEVICES, touch info button, tap to Forget This Device
- Turn off Bluetooth, wait 10 seconds, turn on Bluetooth
- Then power on VR412, and if Bluetooth LED is not flashing, press On/Pair briefly so LED flashes
- You should now be able to connect to VARI VR412 via Bluetooth
- Android users
- Power off VR412 and leave it off
- Open Settings on Android device, select Bluetooth
- If VARI VR412 is listed under Devices, touch gear Icon, and tap to Unpair
- Turn off Bluetooth, wait 10 seconds, turn on Bluetooth
- Then power on VR412, and if Bluetooth LED is not flashing, press On/Pair briefly so LED flashes
- You should now be able to connect to VARI VR412 via Bluetooth
Try these three adjustments
- Turn up the VOLUME knob on rear of VRS18
- Try setting the LEVEL switch on VRS18 rear panel to -10
- Follow rear panel instructions for TIME ALIGNING DELAY: Set up this unit and your full-range speakers, and play audio through the system. Then turn DELAY knob until maximum bass is heard.